

Installation
This page covers a from-scratch install of FOCI on an Ouroboros (STM32H723ZG) board wired to a Klipper host running on a Raspberry Pi. Three steps:
- Flash the Katapult bootloader onto the board (one-time, over USB DFU).
- Download and flash the FOCI firmware through Katapult.
- Install the
klipper-focihost module.
Prerequisites
Section titled “Prerequisites”-
The Ouroboros board’s USB port connected to the Pi.
-
SSH access to the Pi.
-
dfu-util,git, and agcc-arm-none-eabitoolchain on the Pi (Klipper’s own setup already installs the ARM toolchain; if you built Klipper’s MCU firmware on this Pi before, you have it):Terminal window # Install the DFU flashing tool and build dependenciessudo apt updatesudo apt install -y dfu-util git build-essential
1. Installing Katapult on the Ouroboros
Section titled “1. Installing Katapult on the Ouroboros”Katapult is the USB bootloader FOCI’s flashing tooling talks to. It’s flashed once, directly to the STM32H723 over its ROM DFU bootloader; after that, updating FOCI itself never needs DFU again.
Build Katapult
Section titled “Build Katapult”On the Pi:
# Fetch Katapult and open its build configuration menugit clone https://github.com/Arksine/katapult ~/katapultcd ~/katapultmake menuconfigConfigure the menu with the settings below. This is the exact configuration validated against Ouroboros hardware:
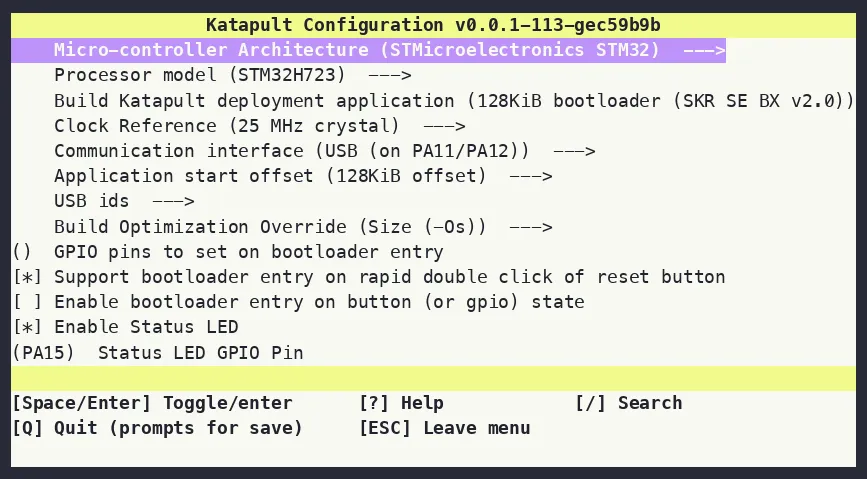
USB ids and Build Optimization Override are left at their stock defaults;
nothing to change there.
| Setting | Value |
|---|---|
| Micro-controller Architecture | STMicroelectronics STM32 |
| Processor model | STM32H723 |
| Build Katapult deployment application | 128KiB bootloader |
| Clock Reference | 25 MHz crystal |
| Communication interface | USB (on PA11/PA12) |
| Application start offset | 128KiB offset |
| GPIO pins to set on bootloader entry | (blank) |
| Support bootloader entry on rapid double click of reset | enabled |
| Enable bootloader entry on button (or gpio) state | disabled |
| Enable Status LED | enabled |
| Status LED GPIO Pin | PA15 |
Save and exit, then build:
# Rebuild against the saved configmake cleanmake -j4Put the board in DFU mode and flash
Section titled “Put the board in DFU mode and flash”-
On the Ouroboros board, hold the BOOT button, tap RESET, then release BOOT. This drops the STM32H723 into its ROM DFU bootloader.
-
Confirm it enumerated as a DFU device:
Terminal window lsusb | grep -i "0483:df11"You should see a line like
Bus 001 Device 004: ID 0483:df11 STMicroelectronics STM Device in DFU Mode. If nothing shows up, repeat the BOOT+RESET sequence. It’s timing-sensitive. -
Flash Katapult:
Terminal window sudo dfu-util -a 0 -s 0x08000000:leave -D ~/katapult/out/katapult.bin -d 0483:df11 -
After it leaves DFU, confirm Katapult is running:
Terminal window ls /dev/serial/by-id/ | grep katapultYou should see something like
usb-katapult_stm32h723xx_<serial>-if00. If nothing shows up, double-tap RESET. Katapult’s double-reset entry (enabled above) also drops it back into the bootloader if theleavereset didn’t fully take. This is a one-time step. Katapult stays resident even as you reflash FOCI itself.
2. Downloading and flashing the firmware
Section titled “2. Downloading and flashing the firmware”FOCI release builds are published as GitHub Release assets on
foci-rs/foci, named
ouroboros-fw-v<version>-<flavor>.bin (<flavor> is prod for normal use,
trace only when you specifically need the USB trace-capture stream for
diagnostics).
With Katapult already resident on the board (step 1), flashing FOCI itself
never needs DFU or the BOOT/RESET buttons again. Katapult’s own
flashtool.py handles it over the serial connection.
Download
Section titled “Download”On the Pi:
-
Look up the latest release’s version tag:
Terminal window FOCI_VERSION=$(curl -s https://api.github.com/repos/foci-rs/foci/releases/latest \| grep -Po '"tag_name": *"v\K[^"]+') -
Download the firmware binary and its checksum, then verify it:
Terminal window curl -LO "https://github.com/foci-rs/foci/releases/download/v${FOCI_VERSION}/ouroboros-fw-v${FOCI_VERSION}-prod.bin"curl -LO "https://github.com/foci-rs/foci/releases/download/v${FOCI_VERSION}/ouroboros-fw-v${FOCI_VERSION}-prod.bin.sha256"sha256sum -c "ouroboros-fw-v${FOCI_VERSION}-prod.bin.sha256"
-
Find the Katapult device:
Terminal window ls /dev/serial/by-id/ | grep katapult -
Flash the downloaded
.bin:Terminal window python3 ~/katapult/scripts/flashtool.py \-d /dev/serial/by-id/usb-katapult_stm32h723xx_<serial>-if00 \-f ~/ouroboros-fw-v${FOCI_VERSION}-prod.bin \-vflashtool.pyconnects to the bootloader, writes the application, and verifies it against a SHA1 of the written flash. AFlash Success(orProgramming Complete, depending on the Katapult version) line at the end means the board is now running FOCI and will enumerate as a Klipper MCU. -
Confirm the board enumerates as FOCI/Klipper, not Katapult:
Terminal window ls /dev/serial/by-id/ | grep -i fociNote down this
/dev/serial/by-id/...path. You’ll need it for the[foci <stepper>]section in your printer config.
To reflash later, for a firmware update, repeat the Download and Flash steps. Katapult is already there waiting.
3. Installing the FOCI Klipper module
Section titled “3. Installing the FOCI Klipper module”FOCI needs a small Python module (klipper-foci) installed into Klipper’s
klippy-env so Klipper knows how to talk to the FOCI MCU. Run this on the
printer’s Pi:
curl -sL https://raw.githubusercontent.com/foci-rs/foci/main/install.sh | bashThis detects Kalico vs. mainline Klipper, installs the package from the
project’s self-hosted index, places the loader shim in the right
klippy/extras (or klippy/plugins) directory, and registers it with
Moonraker’s update_manager so it keeps itself updated going forward.
Add the diagnostics extra if you need it:
curl -sL https://raw.githubusercontent.com/foci-rs/foci/main/install.sh | bash -s -- --diagnosticsRestart the Klipper service after installing. FIRMWARE_RESTART only resets
the MCU; it does not reload Klipper’s Python modules. A newly installed
extra needs the full service restart:
sudo systemctl restart klipperContinue with Configuration to add the
board to printer.cfg.